Send a document for signature
Sending a document takes four steps, always in the same order. The wizard will not let you move on while the current step is incomplete — Next stays disabled.
New document first asks “Who is going to sign? The answer decides the path.” This page is the Send for signature card — “For a document other people sign too.” If the document is yours alone, the other card, Sign it myself, now, takes three steps instead of four: see Sign a document yourself.
| # | Step | What it is for |
|---|---|---|
| 1 | Documents | Add documents to sign |
| 2 | Recipients | Who receives this document and how they sign |
| 3 | Signatures | Prepare annotations on the documents |
| 4 | Review & Send | Recipients, message, deadline and resources — then send |
From step 3 onwards you can use Save draft and come back later. The wizard also saves by itself — you will see “Auto-saving draft…”.
1. Documents
Section titled “1. Documents”Drag the files in or use Select files. It accepts PDF/DOCX, up to 128 MB per file.
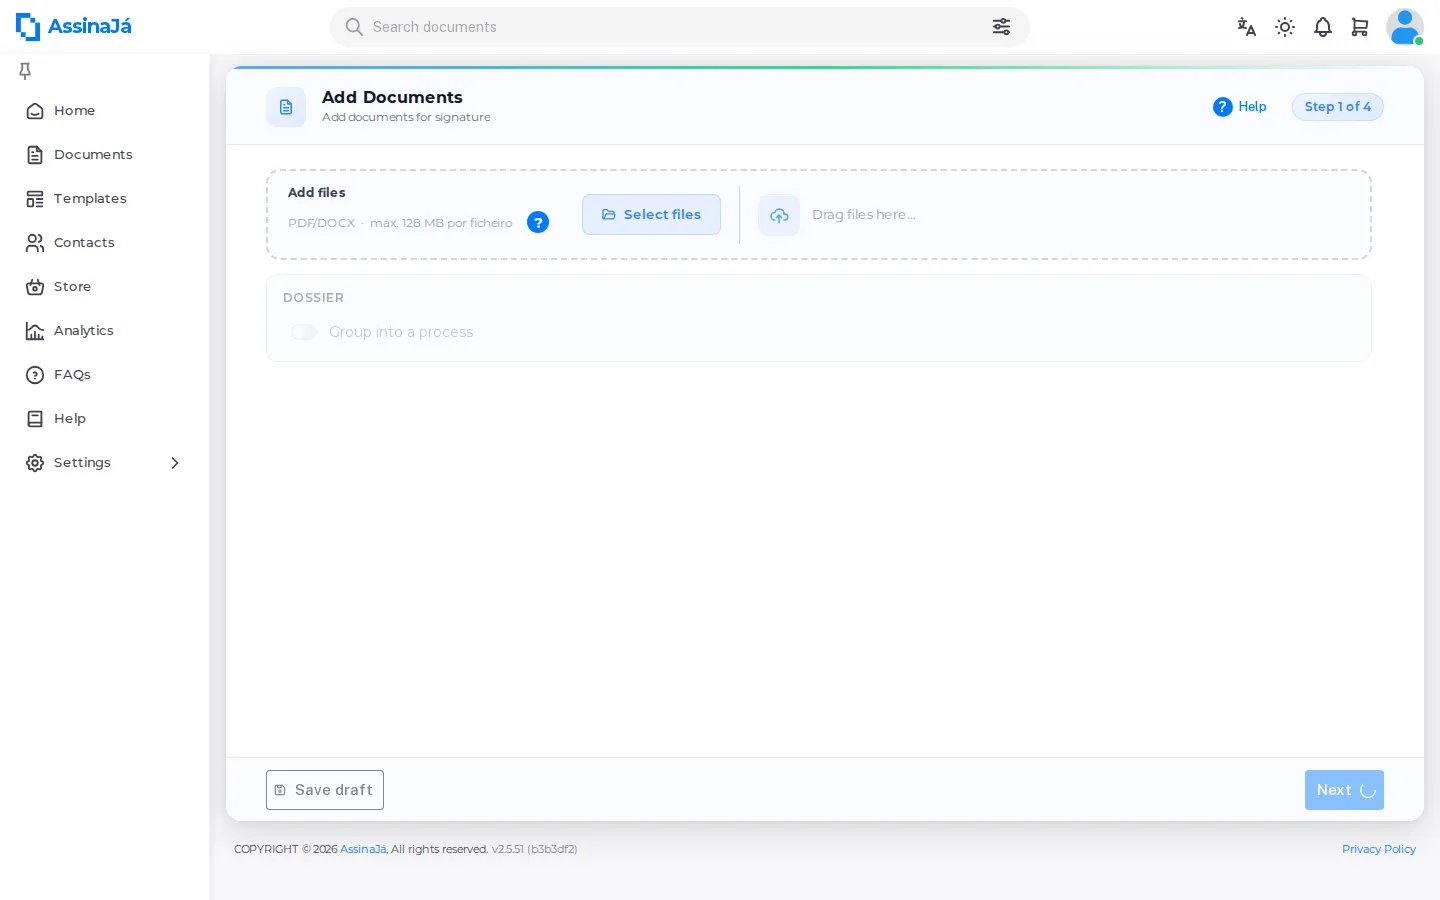
You can add more than one file. They travel in the same process and are signed together — anyone on copy receives the complete set of documents.
A Word file is converted to PDF, and it is the PDF that gets signed. Check it before moving on: pagination can shift during conversion.
2. Recipients
Section titled “2. Recipients”This step decides the two things that matter most: who is involved and how each person takes part.
Add the people involved, choose who signs and who only receives a copy, and select a signature type to apply to everyone.
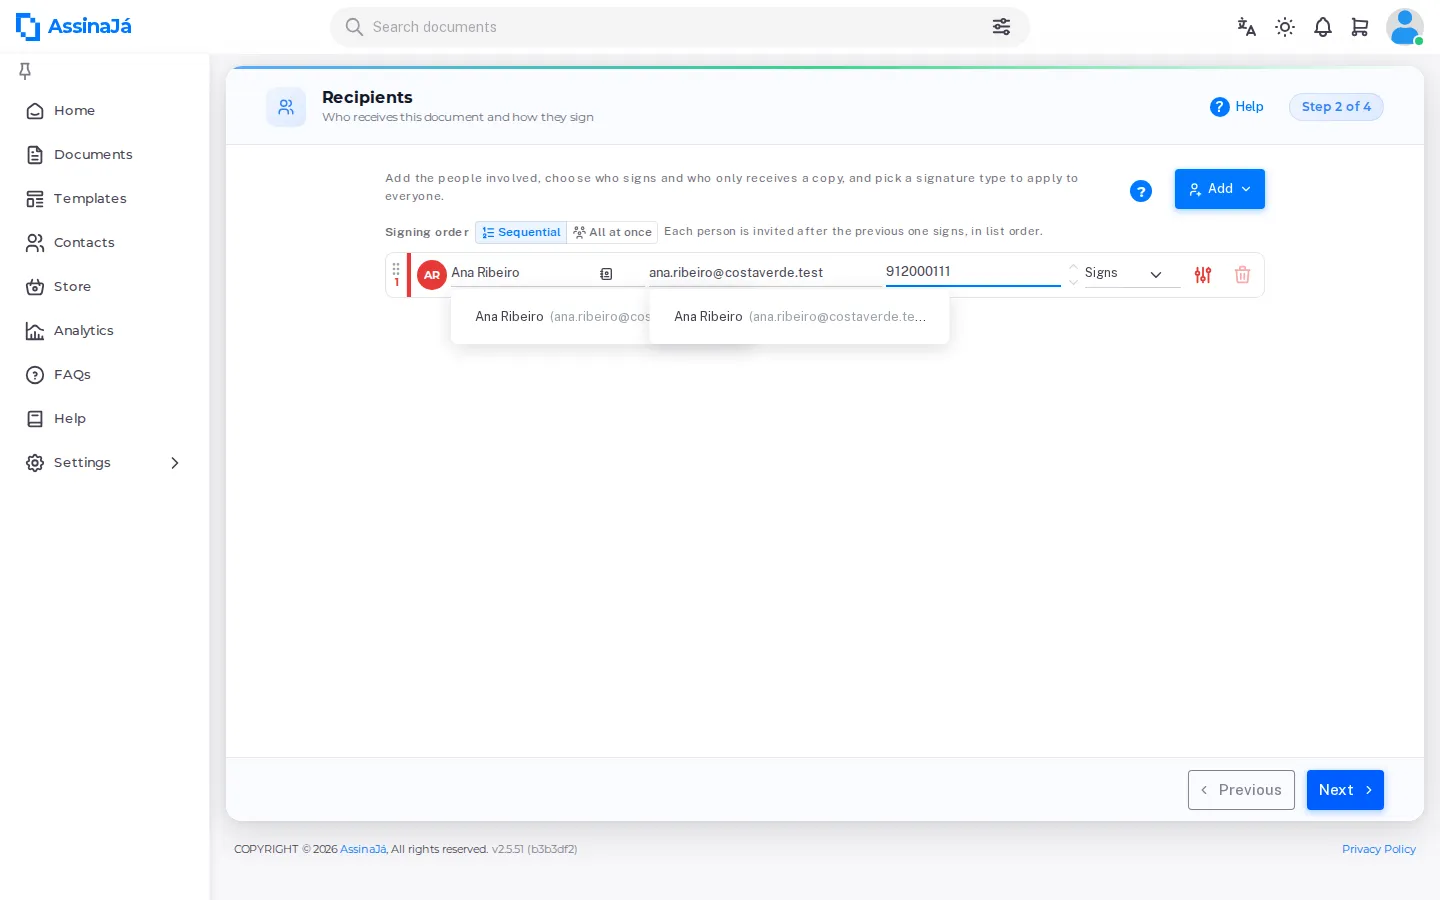
Each row holds, left to right:
| Element | What it does |
|---|---|
| ⠿ and the number | Drag to change the signing order — sequential mode only |
| Name · Email · Phone number | The person’s details |
| List icon | Pick from your contact list |
| Signs / Receives copy | This person’s role |
| Customise | The settings for this person alone — see below |
| Bin | Remove the row |
Add opens a menu: New recipient, Contact list, My contact info and Import list.
The signing order
Section titled “The signing order”Above the list sits Signing order, and this is where you decide whether people sign one after another or all at the same time.
| Option | What the application says |
|---|---|
| Sequential | “Each person is invited after the previous one signs, in list order.” |
| All at once | “Everyone is invited at the same time and signs in any order.” |
Sequential is what you start with. Under it, position in the list is the real order of the process: the number beside the ⠿ is each person’s turn, and anyone whose turn has not come up shows as In queue to sign.
Under All at once that number disappears and the list can no longer be reordered — nobody has a turn. The ⠿ now reads “No order — everyone is invited at the same time”. Everybody gets the email the moment you send, and nobody waits for anybody.
Each signer’s settings
Section titled “Each signer’s settings”The Customise button opens a panel titled with the person’s name, holding two tabs: Recipient and Message.
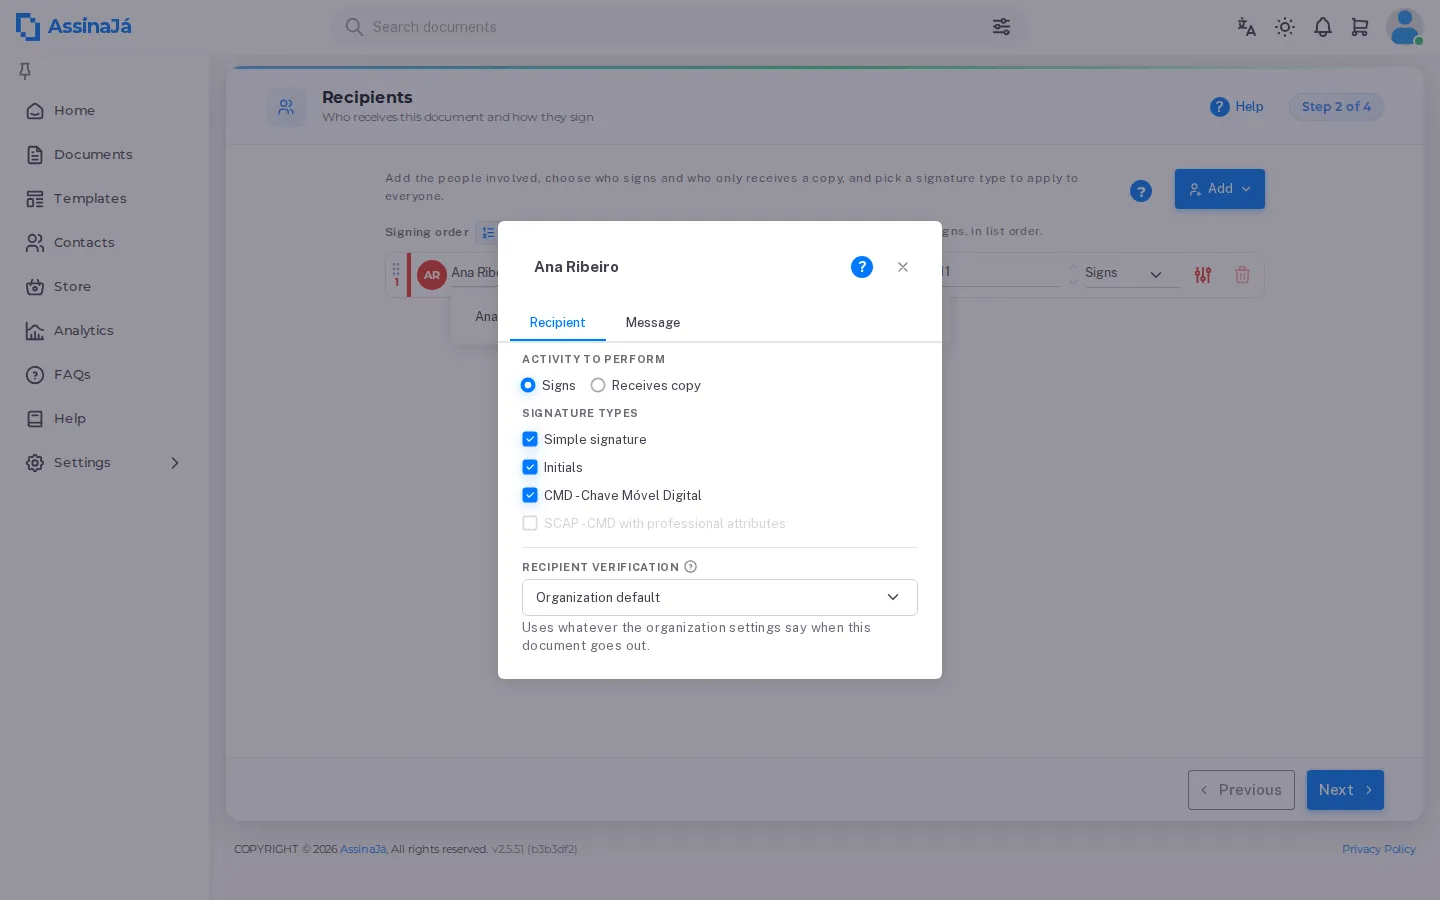
Activity to perform — Signs or Receives copy. Same as the column on the row, repeated here for convenience.
Signature types — and here is the part that usually surprises people: these are checkboxes, not a single choice. The same person can hold more than one type on the same document.
| Option | What it is |
|---|---|
| Simple signature | A drawn or typed visual signature |
| Initials | Initials, for initialling pages |
| CMD - Chave Móvel Digital | Qualified signature — see Qualified signatures with CMD |
| SCAP - CMD with professional attributes | Qualified, and proves professional capacity |
| LDC - Local Digital Certificate | Advanced, with the signer’s own digital certificate — see Sign with your own digital certificate |
A new signer arrives with Simple signature and Initials already ticked; if the organisation has CMD balance, CMD as well; and if professional attributes are enabled, SCAP too. That way the next step shows everything you can place, with nothing hidden in a menu. LDC - Local Digital Certificate is never ticked by default: tick it when the person has a certificate of their own. A type with no zones placed is dropped from the send and costs nothing — see How a signature is counted.
Recipient verification — defaults to Organization default: it uses whatever the organisation settings say at the moment the document is sent. You can raise or lower the level for this person alone. The default lives in Configure organisation policies.
The options that appear only without a qualified signature
Section titled “The options that appear only without a qualified signature”These sections do not appear with CMD or SCAP. Untick them — or choose Local Digital Certificate — and two new sections appear in the panel:
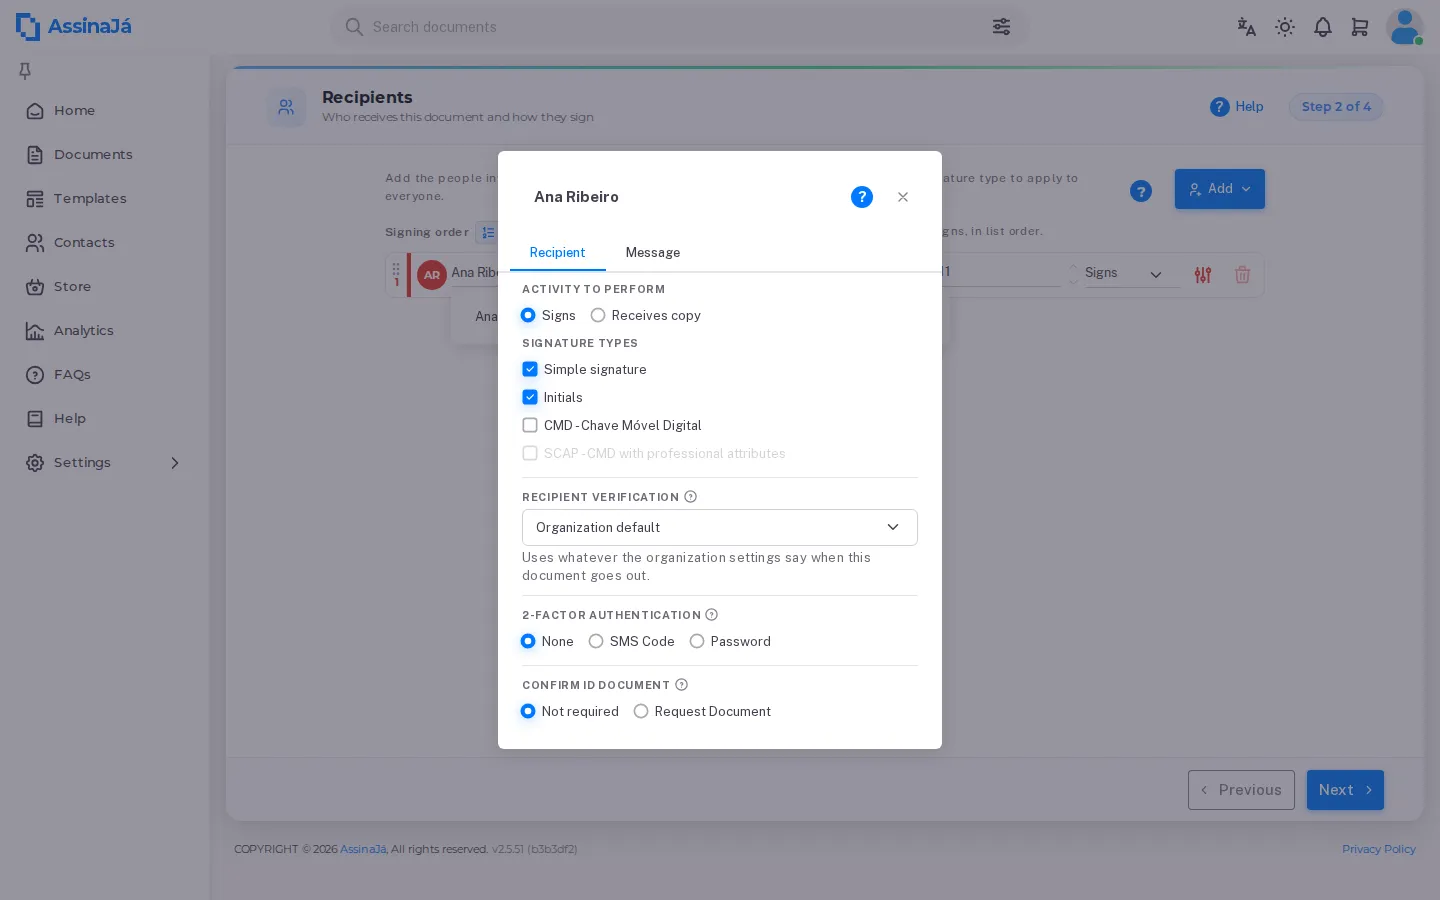
2-Factor Authentication — None, SMS Code or Password:
When signing, the signer will receive an access code via SMS that must be entered to access the document.
When signing, the signer must first enter the following password to access the document.
You set the password yourself and must pass it on by some other channel. The SMS code needs the phone number filled in on the row.
Confirm ID Document — Not required or Request Document, with a National ID Card or Passport and its number:
The signer must confirm their identification to proceed with signing the document.
With Local Digital Certificate both sections stay. The certificate is not verified by the State the way Chave Móvel Digital is: the SMS code or password is the proof of who opened the link, and the identity document number you enter here is checked against the certificate’s at signing time — see What AssinaJá checks.
The Message tab
Section titled “The Message tab”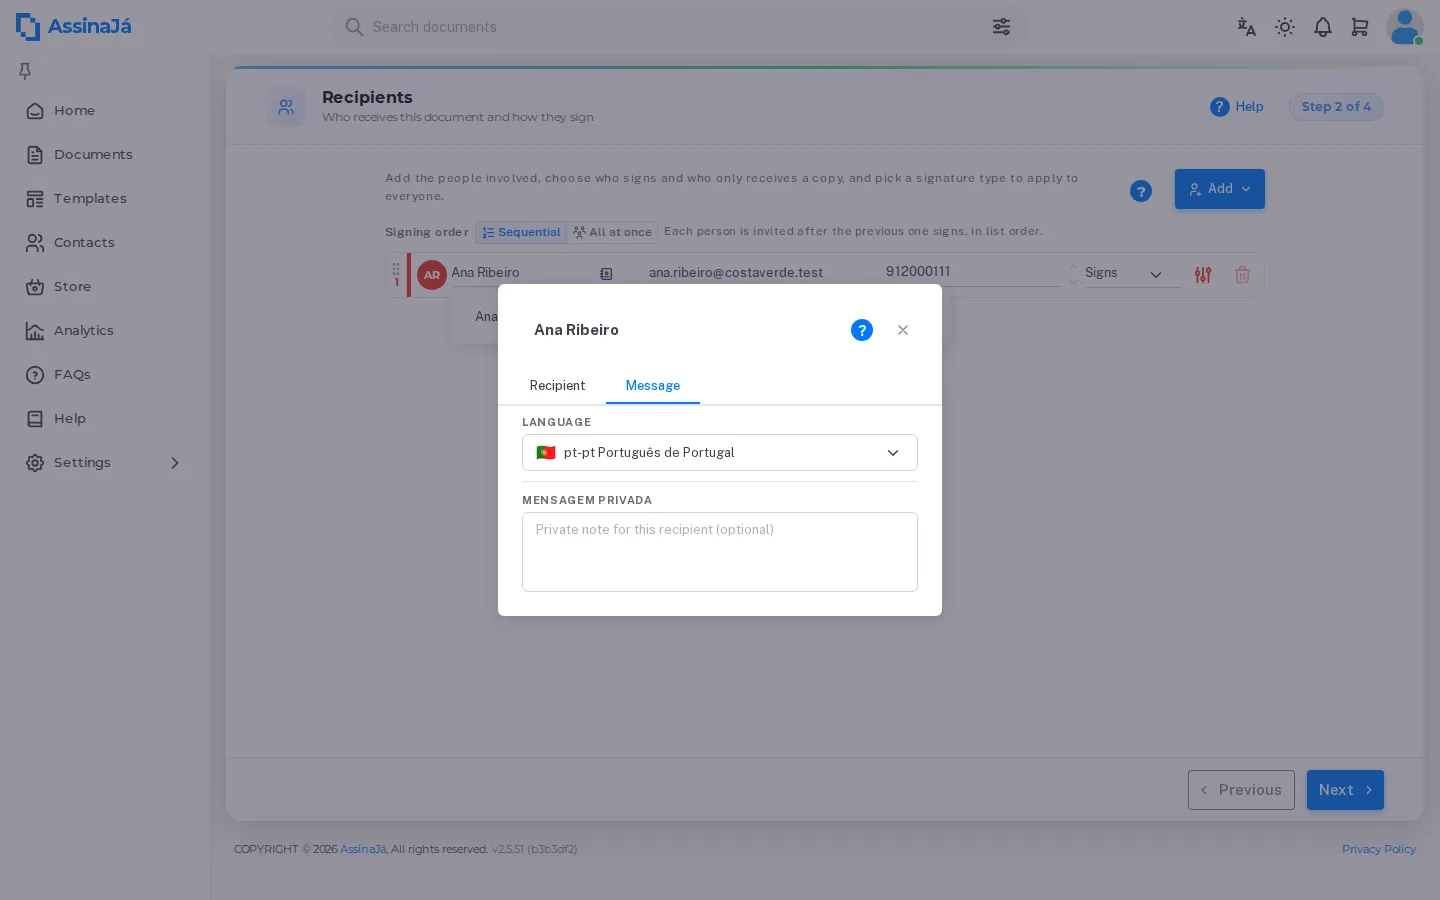
Language decides which language this person’s email and signing screen use. Private message adds text only this person reads — useful for instructions that do not concern the others.
What the wizard blocks, and what it only warns about
Section titled “What the wizard blocks, and what it only warns about”Blocks: moving on without at least one person who Signs. The Next button stays disabled, with no message, until there is a signer and every row has a name, a valid email and a language. With several documents, each signer has to sign at least one, and each document has to have someone signing it.
The phone number on the row is needed only for the SMS code. For Chave Móvel Digital, the signer enters it in the signing wizard.
Warns, without blocking: your own email as a signer, the same person as both signer and copy, or a duplicated contact.
3. Signatures
Section titled “3. Signatures”The editor step: Prepare annotations on the documents.
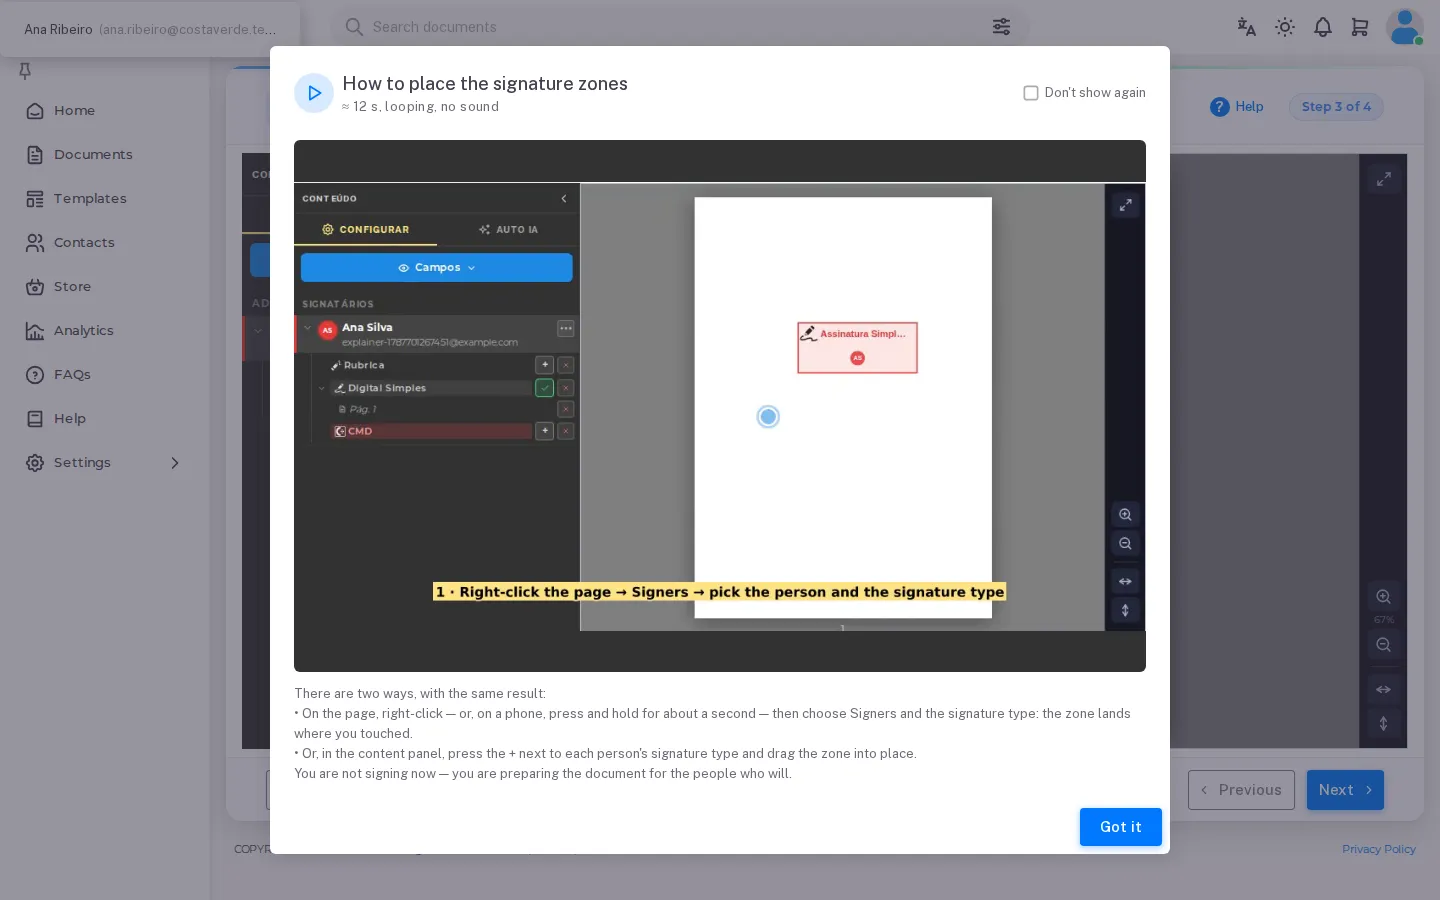
The video that opens the first time
Section titled “The video that opens the first time”The first time you reach this step, a short video opens — How to place the signature zones — about 12 seconds, looping and silent, with this text underneath:
There are two ways, with the same result:
• On the page, right-click — or, on a phone, press and hold for about a second — then choose Signers and the signature type: the zone lands where you touched.
• Or, in the content panel, press the + next to each person’s signature type and drag the zone into place.
You are not signing now — you are preparing the document for the people who will.
Got it closes it, and Don’t show again stops it coming back. That “seen it” is stored in the browser itself — not in your account — so on another computer, in another browser, or after clearing the site data, the video appears once more. The Content panel has no button to reopen it; the help in the top-right corner opens the explanation of this step.
On narrow screens a different recording is shown, made with a long press instead of a right-click. The gestures are not the same, and the shrunken desktop video did not teach them.
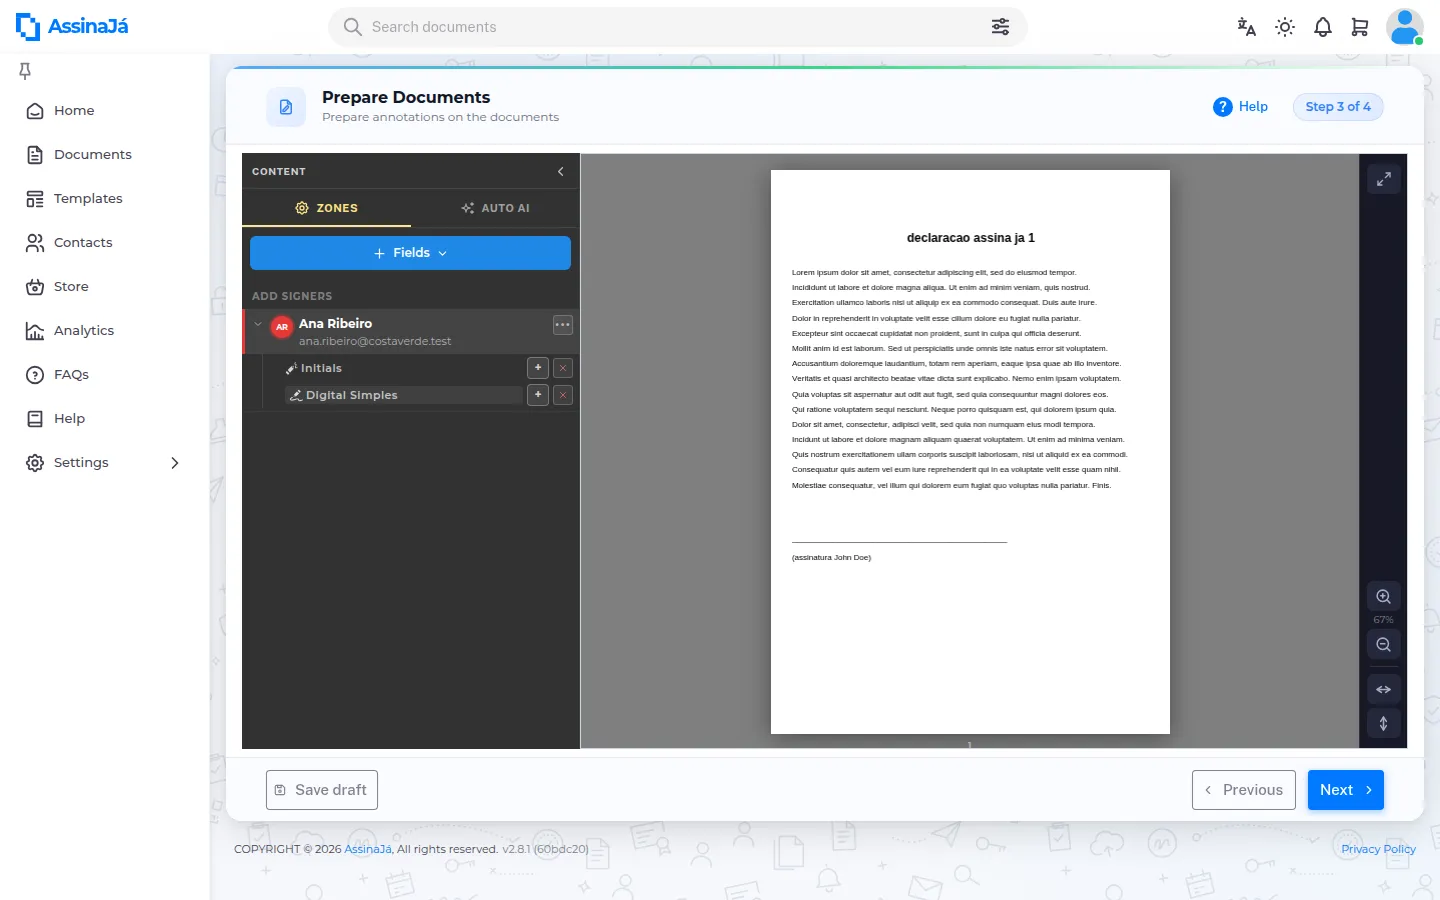
On the left, Content, with the Zones and Auto AI tabs. In Zones, the Fields button opens three groups — Fixed, Dynamic and Fill in — and picking a type places it straight away on the page you are viewing.
Below sits the Signers list. Under each person there is one row per signature type you gave them — Initials and CMD in the example — each with:
- + — add a zone of that type to the document
- × — remove that type from this signer
The signers themselves — who they are, their name, their email, who leaves — are changed in the Recipients step, not here.
As you place fields, the sections Fixed content, Dynamic content and Fields to fill in appear underneath, listing the fields already placed in each. A section only appears once it has at least one field.
On the right sits the document, with zoom, fit to width and fit to height.
The fast way: right-click
Section titled “The fast way: right-click”Right-clicking on the page opens a menu at the exact point you clicked:
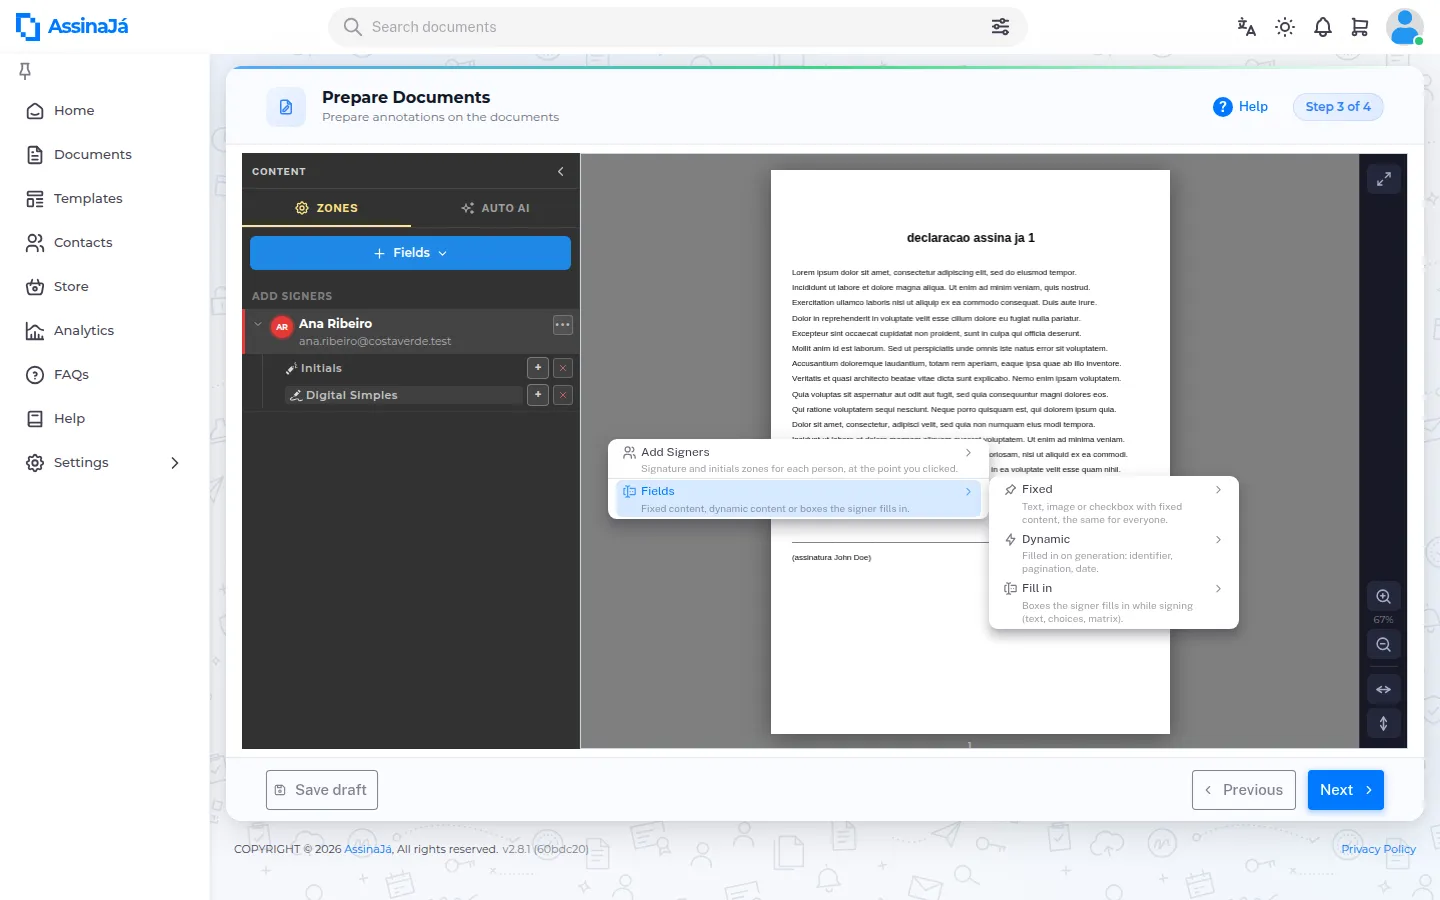
| Entry | What the application says |
|---|---|
| Signers | “Signature and initials zones for each person, at the point you clicked.” |
| Fields | “Fixed content, dynamic content or boxes the signer fills in.” — opens Fixed, Dynamic and Fill in |
Every entry in the menu, and every type inside it, carries a line of explanation under its name.
It is quicker than dragging, and it puts the zone where the pointer is rather than dropping it by eye. For a contract that needs a signature at the foot of every page, it is the difference between one minute and five.
Once placed, a zone can be dragged and resized by its corners.
Questions the signer fills in while signing
Section titled “Questions the signer fills in while signing”The Fill in group places boxes on the document that the signer fills in at the moment of signing — a tax number, a start date, a choice between options. They differ from Fixed and Dynamic fields, which you, or the platform, fill in before sending.
| Type | What the application says |
|---|---|
| Free text | “The signer writes a text; you may limit its length and format.” |
| Date | “The signer picks a date, within the limits you set.” |
| Number | “The signer writes a number; optional decimals and limits.” |
| Option (choice) | “One box of a choice question; several boxes make the group.” |
| Choice list | “The signer picks one entry from a list you define.” |
| Matrix | “A rows × columns grid; the signer marks one cell per row.” |
Selecting a box opens that box’s panel on the right, titled with its type:
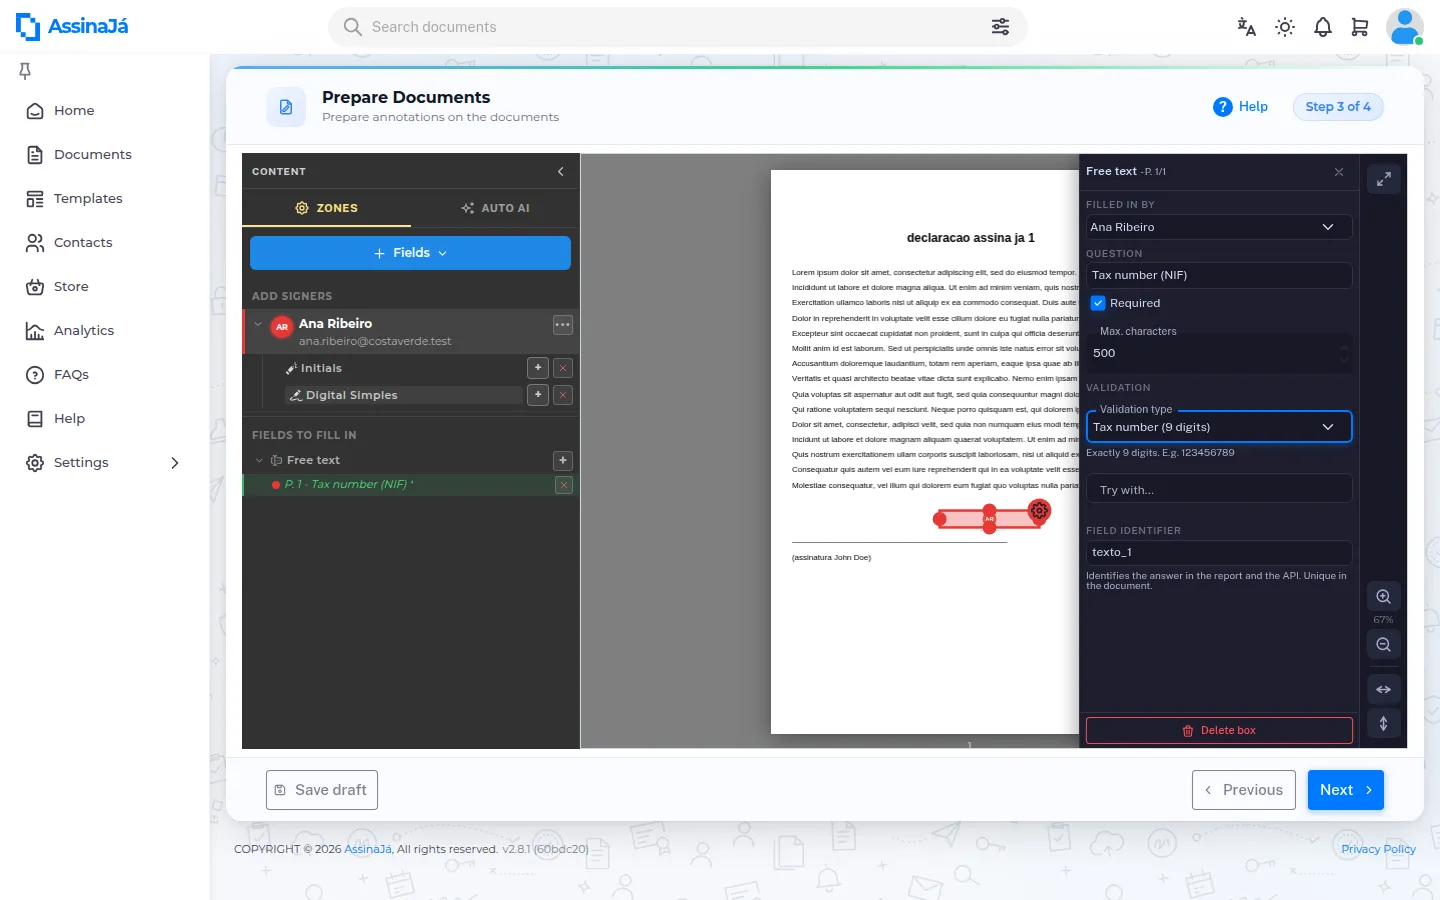
- Filled in by — the person who answers. Each box belongs to one person.
- Question — the text the signer sees. Up to 200 characters.
- Required — without an answer, the person cannot complete their signature.
- Field identifier — “Identifies the answer in the report and the API. Unique in the document.”
And, depending on the type:
- Free text — Max. characters and Validation type: Any text, Digits only, Letters and spaces only, Letters, digits and spaces, Email address, Tax number (9 digits), Postal code (0000-000) or Other (regular expression). With Other you write the expression, which applies to the whole text; Try with… tells you whether a sample Passes. or Does not pass.
- Date and Number — Minimum and Maximum; for a number, also Decimal places.
- Option (choice) — each box is one option, laid over the square printed on the document. Boxes sharing the same identifier make up one question, with Single choice or Multiple choice under Mode.
- Choice list — the Choices, and at most one Preselected.
- Matrix — # Rows and # Columns, Result by row or column, Selection with One choice or Several choices, and an optional List of values: “Without a list, the answer is the number of the choice (1, 2, …).”
Who a new box belongs to. In sequential order, to the signer who signs first; in parallel, to the first one in the list. Change it under Filled in by. If you want the same question answered by two people, place two boxes.
Whoever answers must sign. A person with boxes to fill in needs a signature or initials zone in the same document — that signature is what attests the answers. Without it, Next opens Fields to fill in need fixing, with one line per problem — in this case, “[name] has fields to fill in but no signature or initials zone in this document.”
If you remove a signer, their boxes pass to another person who stays.
They cost no credits. A box to fill in is not a signature: it is not charged and does not count in the resource summary of step 4.
What happens to the answers. Each answer is written into the PDF that person signs, where the box is, and is also kept as data — it appears in the completion report and in the API. Other signers only see an answer once the person who gave it has signed, and from then on nobody can change it.
One qualified signature per person, per document
Section titled “One qualified signature per person, per document”Simple Signature and Initials zones repeat as often as you like, but each person signs with CMD, SCAP or Local Digital Certificate only once per document. The editor refuses a second qualified zone:
Each signer signs with the Digital Mobile Key only once per document. Remove the existing qualified zone before placing another.
The message is the same for a Local Digital Certificate zone. The reason is in Rules to know.
Each zone costs one credit, of that zone’s own type
Section titled “Each zone costs one credit, of that zone’s own type”The charge is made per zone placed, and each one pays for the resource of its own type — initials cost a simple signature, even for someone who signs with CMD. The full table is in How a signature is counted.
The order within one person
Section titled “The order within one person”A signer holding visual signatures and CMD does the visual ones first and the CMD last, because CMD seals the document. It is a per-person rule, and only that: it does not require CMD signers to sit at the end of the list, and it does not stop several people signing with CMD at the same time — see Sign a document.
4. Review & Send
Section titled “4. Review & Send”The final step gathers the rest: copy recipients, the notification email’s subject and message, the deadline, and the summary of resources the send will consume.
The platform seal
Section titled “The platform seal”There is nothing to switch on. Every document published from the wizard carries the platform’s certifying seal, applied before any signature — except documents that arrive already signed. See Secure final document.
Grouping into a process
Section titled “Grouping into a process”With several files you can give them a Process name — “E.g. Lease agreement” — and treat them as a single process. There is also Send automatic reminders.
On a free organisation: confirm your mobile number
Section titled “On a free organisation: confirm your mobile number”An organisation on the free plan only sends documents once the person who created it has confirmed their mobile number by SMS. It happens once, and it is there to protect the free plan from accounts created in bulk — “We send a code by SMS to confirm the account is yours. We don’t use your number for advertising.”
If you have not done it yet, pressing send opens One more step before sending — “Once confirmed, sending continues from here without losing anything.”:
- Mobile number — your number, with the country code — and Send code.
- “We sent the code to {number}. It is valid for {n} minutes.” Type the 6-digit code and Confirm. If it does not arrive, Resend code — available after a moment, with the countdown in Resend in {time} — or Change number.
- Mobile number confirmed — “The number is now linked to your account.” Sending carries on by itself from here.
The rule is checked before the send writes anything: nothing is debited and nobody is invited until the number is confirmed. It runs wherever a document goes out — this wizard, Use template, Sign now and the API — and it does not depend on who presses the button:
- What counts is the mobile number of whoever created the organisation, not the sender’s. A colleague in a free organisation whose Owner has not confirmed yet sees Sending unavailable — “This organisation can only send documents after the account owner confirms their mobile number. Ask them to sign in to AssinaJá and confirm it.” — and confirming their own number changes nothing.
- Organisations on a paid plan do not go through this. Neither do invited signers: signing is not sending.
You can get ahead of it: the same dialog, Confirm your mobile number, opens once when you arrive in the application with the organisation just created, with Later to close it. After that a reminder stays on the home screen — “Confirm your mobile number to send documents.” with Confirm now — until the number is confirmed. It can also be done from your profile: see The contact has to be validated.
| Message | What to do |
|---|---|
| “The number is not valid. Check the country code and the digits.” | Check the country code and the number. |
| “This is not a mobile number. Enter a number that can receive SMS.” | Mobile numbers only. |
| “We don’t send SMS to numbers from this country yet.” | Use a number from a served country. |
| “This number is already linked to another account. If it is yours, contact us.” | Each number confirms one account only. |
| “We sent a code a moment ago. Wait a little before requesting another.” | Wait for the Resend in countdown. |
| “You have reached the limit of code requests. Try again later or contact us.” | There is a cap on requests; come back later. |
| “Too many attempts for this code. Request a new code.” | Resend code. |
| “The code has expired. Request a new code.” | Resend code. |
| “The code is not correct. Check the message and try again.” | Check the six digits in the SMS. |
| “SMS cannot be sent right now. Try again in a few minutes.” | A temporary sending failure; not your number. |
If your balance is short
Section titled “If your balance is short”The balance is checked before sending does anything at all. If it falls short, nobody is invited, nothing is debited, and a dialog opens:
You need {n} more simple signatures to send this document
Your document is saved as a draft — nothing was lost.
Buy a pack to top up your balance, then send the document.
You currently have {n} simple signatures.
The resource named changes with the case — Chave Móvel Digital signatures, signatures with professional attributes, MB of storage… Below it, Choose a pack lists the packs on sale with their price, and Buy pack opens the store with that pack already selected. Back to draft reopens the wizard where you were. The dialog does not close on Esc or a click outside — only through one of the two buttons — and, yes, you do have to come back to the draft yourself after buying.
If you press send again on a document that has meanwhile gone out, the answer is “This document has already been sent. You can follow it in the document list.”
See Plans, credits and extras.
After you send
Section titled “After you send”The document moves to Processing while the platform seals it — in the list, it sits in the In preparation view meanwhile — then to Waiting. When the last signature lands it passes through Finalizing before it is Completed. See Document lifecycle.